Last November, a comment from handweaver Sandra Rude (www.sandrarude.blogspot.com) about her methods for using wood shavings for dyeing led me to her blog, where she has recipes for preparing and using dyebaths from wood shavings. First, she soaks the shavings in alcohol (or methylated spirits) for several weeks to extract the colour. When the liquid has developed a strong colour, she strains off the liquid then adds the fibres, plus enough water as necessary to allow the fibres to move freely in the solution. The dyebath is then heated gently (but no higher than 140F) and the fibres are left to soak until they have taken up the colour. (For further details, look at Sandra’s blog using the link above.)
This method of colour extraction is not entirely new to me, as I have used it to extract the purple colour from alkanet (Alkanna tinctoria). It is also recommended for use with the so-called “insoluble redwoods”. These include Sanderswood (Pterocarpus santalinus), Camwood (Baphia nitida), Padauk (Pterocarpus indicus) and Barwood (Pterocarpus soyauxii). Although these dyes can be used following the usual simmering process to extract some of the colour, much colour potential remains unused, as it is not soluble in water. This means that the colours obtained may be considerably paler than those achieved using the alcohol-soak method. So I decided to try out Sandra’s method with Sanderswood and with some Walnut and Redwood (Sequoia sp.) shavings I had been sent some time ago by a woodturner. I also remembered I had some Camwood, not in the form of wood shavings but as pressed wood dust, presumably also mixed with some sort of binder. These circular discs were sold to me some years ago by a Nigerian indigo dyer, who explained that they are used by Nigerians as a facial cosmetic, or decoration, rather than as a textile dye. (My husband also recalls that the same lady told us that camwood is rubbed on babies’ skins as an antiseptic, but I must admit that I can’t remember being told this.)

These are some discs of pressed camwood ready for crumbling up and soaking.
I started by putting a layer of shavings (or crumbled camwood discs) about 2 inches deep in the bottom of a glass jar & then I covered them with methylated spirits. I did this with each of the dyes I wanted to test. I then put the lids tightly on the jars and left the shavings to steep for several weeks until the liquid became strongly coloured. Incidentally, although meths is purple in colour, this purple doesn’t seem to affect the final dye colour. In addition to the dyes I tested, I also steeped shavings of birch in the same way but, as the liquid showed little evidence of colour change, there seemed no point in continuing with them any further.
 Here the dyestuffs are soaking in the methylated spirits and a considerable amount of colour has already been extracted. (Note: If you can read the labels, ignore the word “Barwood” under “Redwood” on the left hand jar, as it’s an error on my part!)
The liquid is then strained off into a dyepot, together with more water as necessary, and the fibres are added.
Do not throw away the meths-soaked wood shavings as they need to be disposed of with care. Return them to their jars in the meantime. Details for disposing of the woodshavings and the used dyebaths are given below.
The crucial thing to bear in mind is that alcohol/methylated spirits is highly flammable & can easily catch fire near a naked flame. So the dyebath should not be heated on a stove with a naked flame, such as gas or coal or wood, but only on an electric heater. If in any doubt, allow the materials to soak in the dyebath without applying heat
I followed Sandra’s instructions but, as I have an electric heater, I heated the dyebath gently & then allowed the fibres to steep to absorb the colour. Below are the samples soaking in the dye solutions.

I was delighted with the results of the dyebaths made from camwood and sanderswood, as these produced really vivid reds not obtainable from the usual simmering method of colour extraction. However, the results from the other two dyebaths were less spectacular. The colours from the walnut shavings were even paler than those I achieved from similar walnut shavings using the usual method of colour extraction. The redwood which, according to the woodturner who supplied it, came from Sequoia sp., gave a rich red colour when soaked in meths but the dyebath produced greenish shades identical to those obtained from the redwood shavings using the usual dyeing method.
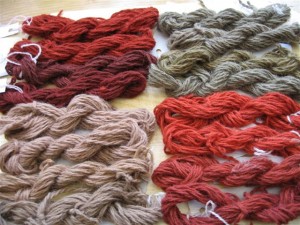
This image shows on the left from top to bottom: Sanderswood + no modifier, acid modifier, alkaline modifier and iron modifier; and Walnut + no modifer, acid, alkali, iron; on the right from top to bottom: Redwood (Sequoia sp.) + no mod, acid, alkali, iron and Camwood + no mod, acid, alkali, iron.
It is interesting that, with this method of colour extraction, the modifiers seem to make less difference in shade than I would have expected.
Although this method of colour extraction using alcohol/methylated spirits can produce really strong, bright colours with some wood shavings, there are several disadvantages to this method of dyeing. Firstly, the smell of the dyebath is very unpleasant if one uses methylated spirits, although the fumes do disappear after a while. Secondly, I found the methylated spirits left the wool fibres feeling a little harsh to the touch. Disposal of the used dyebaths may also present problems, as I would not recommend that they be poured down the drain. I poured mine on the gravel at the edge of my driveway, close to a brick wall. Disposal of the meths-soaked wood shavings might have been difficult, but my husband readily took them, still carefully stored in their glass containers, to use to start his garden fires. Otherwise, I would probably have dug a deep hole in the ground and burned them, then covered the ash with soil. Nevertheless, I was glad I did these experiments as they really illustrated very clearly the colour potential of the “insoluble redwoods” when used with the alcohol extraction method. For the first time, I was able to see some of the colours that were so popular with dyers in the past. So my thanks to Sandra Rude for suggesting these experiments to me. I think next time I will see if I can buy a bottle of cheap vodka to use instead of the meths, as I should imagine that might smell less unpleasant.

A new alum mordant?
/in General Dye InformationRecently I was given a link to a website in Germany, which was offering something called “Kaltbeize AL” or “cold alum mordant”. Naturally, my curiosity was aroused, especially as I had never come across a reference to this anywhere else. So I decided to find out more about this alum mordant, which would appear to be something new.
According to the information on the website (www.textiles-werken.de), this form of alum mordant is suitable for wool and silk and is applied cold. Once made, the same mordant solution can apparently be used many times. The instructions seem to imply that the mordant is only exhausted when the liquid level has dropped too low to enable the fibres to be immersed in the solution.
I ordered some of this alum mordant from the website and decided to do some tests to compare it with my usual alum mordant. I planned to follow the method given on the instructions accompanying the cold alum mordant and also to try out the same method with the aluminium sulphate I usually use to mordant wool.
As far as I was able to ascertain, this mordant would appear to be aluminium formate – something I’ve never come across before. It is apparently made using formic acid, rather than sulphuric acid or acetic acid – hence the name. But that is all I know about its chemical composition so, if anyone knows any more, I’d be grateful for further details.
Unlike with other alum mordants, where the amount of alum used is based on the weight of fibres to be mordanted, with this cold mordant it is the ratio of mordant powder to quantity of water added that would seem to be crucial. So once the solution has been made, no more than 20% more water should be added at any stage. The recommended proportions are 20gms mordant powder per litre of water, so to start with I made 5 litres of solution, using 100gms of Kaltbeize AL. The alum powder is first dissolved in hand-hot water, then added to the pot, which is filled up with cool water to the appropriate level. According to the information given, 5 litres should be sufficient to mordant at least 1 kilo to 1.25 kilos of fibres in total, which is virtually the same as 10% alum – the percentage of alum sulphate I generally use. The fibres can be added in several batches. When the fibres are removed from the mordant, the advice is to squeeze any excess liquid back into the solution, so that as little liquid as possible is lost. (Actually, I found that, after mordanting about 1 kilo of fibres in three batches without adding any more water, the level of the liquid had dropped only slightly. So I would question whether the level of the liquid is really a reliable indicator of the continued viability of the mordant. I would be inclined to assume that after mordanting about 1 to 1.5 kilos per 5 litres of solution, the mordant is probably exhausted. But I may be wrong.)
The first batch of fibres should remain in the solution for at least 4 hours and subsequent batches should remain in the liquid for longer periods. I entered three batches, each weighing about 350gms, and the first batch steeped for 8 hours, the second batch for 12 hours and the third batch for 24 hours. However, the instructions are not specific as to timings and only give general guidelines. There is no limit to the length of time fibres can be left to soak, so they can be left in the mordant bath for several days or even weeks.
I followed exactly the same procedure with an aluminium sulphate solution, dissolving 100gms alum sulphate in hot water then topping it up to 5 litres. I mordanted three identical batches of fibres in this cold solution, so I could compare the results with those from the Kaltbeize AL mordant.
I dyed skeins from each batch from each of the two mordant solutions and the results were interesting. There was hardly any difference in depth of colour achieved from brazilwood when the two mordanting methods were compared. The colour from the Kaltbeize AL mordant bath was very slightly deeper on the fibres from the first batch, but after that the colours from each of the two mordant solutions were virtually identical. These experiments were very useful, as they illustrate clearly that alum sulphate can be used cold, providing the fibres are left in the solution long enough. I think in future I would probably leave the first batch of fibres in an alum sulphate solution for at least 12 hours to start with.
The question then was what to do with the remaining mordant solutions. Might there be some mordant potential left in them? As I’m the type of person who finds it difficult to throw anything away, especially if it might still be useful, I decided to add a further 500gms fibres to each solution. I left these fibres to soak for 36 hours. I then tested a sample of each in several different dyebaths and was surprised to find that they dyed well. This indicated that there had been enough alum remaining in both mordant solutions to mordant the added fibres perfectly satisfactorily. Now I have to decide whether to continue adding even more fibres or whether to assume that the alum is exhausted.
There are still some aspects of this cold mordant I’m not sure about. For example, would there be any difference in the results between 1 kilo of fibres mordanted for 4 hours in a fresh solution and 250gms of fibres mordanted for 4 hours in a fresh solution? Is it possible that the 250gms batch would have absorbed more mordant because the alum had to be divided between fewer fibres? Would my results have been different if I had added all my 1kg of fibres at the beginning, rather than dividing them into three batches? The instructions suggest that each solution is sufficient for about six batches of fibres, but the weight of the batches doesn’t seem to matter. So does this mean that a 5-litre solution would mordant six batches weighing 1 kilo each? How does this mordant work if there seems to be no relation between the weight of the fibres added to the solution and the weight of the alum dissolved into the liquid? Why is the ratio of alum powder to water so important? Surely the mordant must be exhausted before most of the water has evaporated away? If anyone has answers to these queries, I’d love to read them.
If I lived in Germany and had easier access to this new Kaltbeize AL mordant, and if I knew exactly what it is and how it works, I would certainly consider it as an alternative to alum sulphate. However, the high cost of postage to the UK, added to the cost of the mordant, makes it rather expensive. And if I can get similarly good results from alum sulphate used cold in the same way, there would seem little point in incurring the extra cost. But I’d still like to know more about aluminium formate.
Anglo-Saxon Dye Experiments – Part 3
/in General Dye InformationBLUES, GREEN, PURPLE , BROWNS and BLACK
On the left of this picture (unfortunately rather dark) are two shades of blue from a woad fermentation vat, green from dyer’s broom yellow overdyed in the woad vat and purple from the lichen Ochrolechea tartarea. On the right are some browns from walnut leaves and hulls and alder bark and twigs. The black shades are from walnut, oak and alder plus iron water modifier.
Black can be achieved either by dyeing red, yellow and blue in succession over one another, and repeating the overdyeing until a suitable depth of black is reached, or by using the tannin/iron complex.
To use the tannin/iron complex, wool is mordanted with tannin, or dyed in a tannin-rich dye such as oak galls, oak or bramble leaves or alder bark, (or indeed a combination of several tannin-rich dyes), then modified in an iron solution. The depth of colour is best built up by repeatedly simmering the fibres in the iron solution, then airing them for about half an hour to allow the colour to develop. This process can be repeated until a rich black is achieved. Unfortunately, this method tends to weaken wool fibres over a period of time, so the dyed materials will gradually deteriorate. However, if you are not dyeing for posterity it is the simplest way to achieve black.
This picture shows some skeins dyed purple using the lichen Ochrolechea tartarea. They are lying on a piece of old woollen blanket, also dyed lichen purple. The shades are actually more purple in tone and deeper in colour than this photo suggests
The lichen is steeped for several weeks in stale 4-week-old urine (or a solution of 1 part ammonia to 2 parts water), until the liquid becomes deep purple or almost black in colour. The solution should be stirred or shaken vigorously two or three times daily to incorporate oxygen. The liquid is then poured off and water added to make the dyebath. The fibres are then gently simmered in the dyebath for about 45 minutes, then left to cool in the dye liquid. This simmering and cooling process can be repeated several times to increase the depth of colour.
In addition to the colours illustrated by my test samples, many more shades could be achieved by dyeing one colour over another. I think the experiments described in these three posts show that the early Anglo-Saxons would have been able to produce a wide range of colours without using mineral alum or other chemicals dyers tend to rely on today. One of my aims as a dyer is to achieve reliable colours using a minimum of manufactured chemicals and the results of these tests indicate that there is further scope for experimentation in this area.
Anglo-Saxon Dye Experiments – Part 2
/in General Dye InformationREDS, YELLOWS and BROWNS
REDS and YELLOWS
This shows some of the range of shades from madder (Rubia tinctorum) on the left, and weld (Reseda luteola) and dyer’s broom (Genista tinctoria) on the right.
BROWNS and CORALS
The shades on the left are from bramble leaves and sage leaves. On the right are some of the shades from wild madder (Rubia peregrina) & lady’s bedstraw (Galium verum)
Most of the dyes were tested as follows:
The mordants used were clubmoss mordant, tannin mordant (oak gall or bramble leaf solution) and no mordant. The modifiers used were clear vinegar (acid), wood ash water (alkali) and iron water. For the deepest black shades from tannin-rich materials, such as alder bark and oak galls, I used an iron water mordant followed by an iron water modifier. Too much iron does, of course, weaken fibres but iron water is slightly less harmful in this respect than the chemical ferrous sulphate. For a brownish purple shade from madder I used an iron water mordant followed by a wood ash water (alkaline) modifier. Where appropriate for comparison purposes, I also dyed some samples using wool mordanted with 10% alum.
For a further test with madder, I added chopped crab apples to the dyebath. I remembered reading about this some time ago, although I’m afraid I can’t recall where, and thought it worth trying out. I was pleased with the results, as this dyebath gave brighter, clearer shades than those from madder used alone and worked particularly well on unmordanted wool.
I was interested to note that yellows almost as bright and deep as those from a traditional alum mordant could be achieved from weld and dyer’s broom used on unmordanted wool and followed by an alkaline wood ash water modifier. Pretty olive green shades were achieved using an iron water modifier with weld, dyer’s broom, bramble leaves and sage leaves.In general, wood ash water proved useful to deepen and brighten shades. (Stale urine could also be used as an alkaline modifier, as it contains ammonia, but the aroma is perhaps less acceptable.)
To make wood ash water, remove the wood ash from a wood-burning stove, put it in a bucket or large lidded container and fill up with water. The leave the mixture to soak for several weeks. By this time the liquid will have become yellow in colour & feel “slick” or slimy to the touch. To use it as an alkaline modifier, remove the liquid without disturbing the ash sediment and soak the materials in it, adding more water as necessary. It’s better not to apply heat, as this may harm woollen fibres.
Unfortunately the photos don’t show the colours to their best advantage but I was pleased with the results of these tests, which indicated that the early Anglo-Saxon dyers would have been able to achieve a wide range of good, strong colours using only readily available materials and without using mineral alum as a mordant.
As far as light- and wash-fastness are concerned, I imagine these would have been of less importance to the Anglo-Saxons than they are to us today. Clothing was probably not washed as frequently and, if colours faded, clothing could be re-dyed relatively easily, especially as most of the dyes I used in my tests can be applied using little or no heat. As most garments were loose-fitting, a small degree of shrinkage might not have mattered too much. However, the classic dyes, madder, weld and woad, and the tannin-based dyes, such as walnut, oak leaves, oak galls, alder and bramble, all have reasonably good fastness properties, even when used without a mordant, so fading would not have been too much of a problem.
Anglo-Saxon Dye Experiments – Part 1
/in General Dye InformationThese are the classic dyes: madder, weld and woad.
Introduction
I have always been interested in researching the dyeing methods of the past. The Anglo-Saxon period (cAD450 – AD1066) is one that particularly interests me, especially the early Anglo-Saxon period (AD450 – AD700). There is much evidence that, even at this relatively early stage in our history, craftspeople were highly skilled and capable of remarkable levels of craftsmanship, including textiles woven using a variety of sophisticated and complex weaving techniques. The Anglo-Saxons had a variety of naturally-coloured sheep breeds, ranging from beige and brown to grey and black, so some colour patterns could be achieved without the use of dyes. However, dyes were necessary to achieve truly bright shades and to extend the colour palette.
One thing that is still not clear is whether the dyers of the early Anglo-Saxon period would have had access to alum mordants. Alum shale was not discovered in England until the 17th century and before then alum had to be imported, mainly from the Mediterranean. Most experts seem to doubt that mineral alum would have been available widely, if at all, in England during the early Anglo-Saxon period, although it is certainly possible that the necessary trade routes may have been established. Nevertheless, it is perhaps unlikely that a product like alum, that had to be imported, would be readily available to everyone, and most probably more humble dyers would have had to manage without it. So what colour range could they have achieved without using an alum mordant? And what alternative mordants or fixatives might they have used? These considerations formed the basis for my experiments.
The purpose of my tests was to investigate some of the range of shades available to dyers of the period, using only materials to which they would have had easy access. So as my main mordants I used aluminium extracted from clubmoss (see below for more details) and tannin from oak galls, with iron water, vinegar and wood ash water as colour modifiers. As wool would have been the main fibre used by most people, I limited my tests to wool only. Linen and hemp were also used in the period but they appear to have usually been left undyed.
To prepare the tannin mordant, I simmered 50gms of oak galls for about 30 minutes, strained off the liquid and then simmered the fibres in this solution for 30 minutes. This oak gall solution can be stored and re-used several times. As a result of this mordanting process the fibres become light brown in colour and this sometimes has an effect on the colours dyed on a tannin mordant, making them darker or duller.
Although mineral alum may not have been available, excavations at the later Viking Age (Anglo-Scandinavian) site in York (9th – 11th centuries)indicate that dyers there probably used a mordant prepared from clubmoss, which has the ability to accumulate aluminium from the ground in which it grows. However, as the particular clubmoss species found (Diphasium complanatum) is not native to Britain, it is thought likely that it was brought by the Vikings themselves, who were probably familiar with its use as a mordant. Diphasium complanatum is not the only clubmoss capable of absorbing aluminium and it is possible that the Anglo-Saxons may have also used a native species of clubmoss as a source of aluminium for mordanting. Based on this possibility, I decided to try this as part of my experiments. Extracting aluminium from clubmoss is not easy and I would recommend it only for research purposes. I used fir clubmoss, imported from Europe as I did not have access to any locally, but the extraction process takes several days, during which time the liquid has to be kept fairly hot, and application to the fibres takes a similar length of time. I used a recipe from Scandinavia that I happened to come across in a dyeing book from Germany, “Farben aus der Natur” by Gretel Fieler. (Recipe details below) Using alum-mordanted wool and unmordanted wool as controls, my tests with madder indicated that I did indeed manage to mordant my wool samples with aluminium from clubmoss. The resulting shades were very close to those achieved on an alum mordant and certainly redder in tone than the shades produced on unmordanted wool. But more about that later.
Recipe for clubmoss mordant (Lycopodium selago) : Use 100% clubmoss, chop it into small pieces, then pour water over it and heat the mixture to 40C. Keep at this temperature for 3 days, then boil up the mixture once briefly, strain off the liquid and leave to cool. Then add the wool and heat slowly to 40C. Repeat this heating process daily for 3 days. Allow to cool, then remove the wool and rinse.
As far as dyestuffs were concerned, for blues I used woad (Isatis tinctoria) and for purples I used the lichen Ochrolechia tartarea. Lady’s bedstraw (Galium verum) and wild madder (Rubia peregrina) were used for orange and coral shades, and weld (Reseda luteola) and dyer’s broom (Genista tinctoria) for yellows. Madder (Rubia tinctorum), the source of red dye, is a little more problematic. Although madder was available and used during the Roman period, it seems to have disappeared for a while with the departure of the Romans from Britain, suggesting that the dyestuff, rather than the plant, had been brought by the Romans. There is evidence, however, that cultivated madder was in use by the 7th century, so I included it in my tests. Various tannin-rich materials, such as alder, bramble, oak and walnut, were used for browns and black. Walnut, although not native to Britain, was probably introduced by the Romans and there is some evidence that walnut would have been available during the period.
The test results were interesting and provided a wide range of strong colours.
This image shows a selection of colours from my tests.
In Part 2, I will start to describe the experiments in more detail.
Spring is Here!
/in Diary & NewsIt really seems that Spring has arrived. The woad seeds have germinated and I also have seedlings of basil, tomatoes, calendula and zinnias. Only the weld has so far failed to germinate but I will be patient a little longer.
Here are some photos of my garden as it is this week. Just to see the lovely Spring colours and to smell the fragrance of the flowers as I walk through the garden lifts my spirits.
A Jacket for Milly
/in Diary & NewsStarting Another Year in My Dye Garden
/in The Dyer's GardenAlthough the weather is still chilly, it’s time to start thinking about the next year in my dye garden. I like to have as many perennial dye plants as possible, so I have two mature bushes of dyer’s broom (Genista tinctoria) and plenty of madder plants (Rubia tinctorum). I also have lady’s bedstraw (Galium verum), wild madder (Rubia peregrina), dyer’s woodruff (Asperula tinctoria) and two small buckthorn bushes (Rhamnus catharticus). I am nurturing a small evergreen oak, which I grew from an acorn given to me by a friend, and a small Venetian sumac tree (Cotinus coggygria), although it will be a while before these provide serious dyeing materials. The more common Staghorn sumac (Rhus typhina), which grows almost like a weed in our garden, is also a useful tree, especially as a source of tannin. And I mustn’t forget our huge eucalyptus, or the walnut tree, still in its pot, that was given to me three years ago. Unfortunately walnut trees don’t seem to thrive in our garden and I’ve tried several times to plant one, but without success. This is a great pity as walnut is among the most useful of dye sources, so I’m cossetting this one and will continue to re-pot it for as long as I can. Of course, some dye plants have to be grown each year from seed and I usually grow woad and weld every year. If I’m lucky, I don’t have to sow seeds and can rely on self-seeded plants springing up all over the garden, ready to be transplanted to the dye garden.
This year, however, I’ve looked in vain for weld seedlings, so I shall have to sow some weld seeds. As far as woad is concerned, I have plenty of seedlings coming up but I shall also sow some seed, as my friend & fellow dyer, Chris Dobson, has kindly given me some seeds from her woad plants, which seemed so much more vigorous than mine last year. So this week I shall start sowing some seeds. I may also sow some seeds for flowers, such as calendula, which I love and from which I regularly make calendula ointment to treat cuts and rashes, and zinnias, which come in such lovely colours. And I think it will also be time to start off my tomatoes although I don’t usually sow the beans and courgettes until mid-April.
This is a perennial dyer’s broom bush, with a few seed pods to be seen and this year’s new growth starting to develop. Used fresh, the prunings give lovely bright greeny yellows.
This is my small evergreen oak tree. I’m not sure exactly which species of Quercus it is but it may be Quercus ilex, the Holm Oak .
A Useful Purchase?
/in Diary & NewsLast week a friend invited us to a preview of the items she has collected in her garage for a sale next month. She is planning to move house soon, so she has been clearing her house and attic of all the things she has decided she can live without in her next home. As she has been a museum curator and the wife of an antique dealer in past lives, the items for sale make a very interesting collection, especially for those of us who are addicted to weird and wonderful – and sometimes useless – artefacts from the past. So the question is: Do we have room for a full-length sabre in its sheath or two replica Cromwellian helmets or a 12-foot long wooden paddle for putting loaves of bread into and taking them out of the baker’s oven? Well, perhaps not, but I may just find a home for a wooden hat block in the shape of an old-fashioned bonnet and I do have room for a large old iron cooking pot on legs, which has a layer of rusty iron pieces in the bottom. And my husband will certainly find space on his bookshelves for two volumes of British history, especially as the date inside them is 1794, making them very old books indeed.
So what possible use will I have for this large iron cooking pot?
Well, first of all I shall remove all the rusty bits of iron from the bottom and put them in a large container and fill it up with a mixture of 2 parts water to 1 part clear vinegar. This will then be allowed to stand for a few weeks and then become my next supply of iron water.
This image shows the pieces of rusty iron ready to be made into iron water.
As for the pot itself, I shall first check that it’s waterproof. If it is, when the weather is warmer it will be the basis for some outdoor dyeing experiments to see the effects of dyeing in an iron pot, using unmordanted wool.
And if it’s not waterproof? Well, that will be a shame but I’m sure the pot will look quite impressive with some plants growing out of it.
Dyeing with Wood Shavings
/in Dyeing Tips & RecipesLast November, a comment from handweaver Sandra Rude (www.sandrarude.blogspot.com) about her methods for using wood shavings for dyeing led me to her blog, where she has recipes for preparing and using dyebaths from wood shavings. First, she soaks the shavings in alcohol (or methylated spirits) for several weeks to extract the colour. When the liquid has developed a strong colour, she strains off the liquid then adds the fibres, plus enough water as necessary to allow the fibres to move freely in the solution. The dyebath is then heated gently (but no higher than 140F) and the fibres are left to soak until they have taken up the colour. (For further details, look at Sandra’s blog using the link above.)
This method of colour extraction is not entirely new to me, as I have used it to extract the purple colour from alkanet (Alkanna tinctoria). It is also recommended for use with the so-called “insoluble redwoods”. These include Sanderswood (Pterocarpus santalinus), Camwood (Baphia nitida), Padauk (Pterocarpus indicus) and Barwood (Pterocarpus soyauxii). Although these dyes can be used following the usual simmering process to extract some of the colour, much colour potential remains unused, as it is not soluble in water. This means that the colours obtained may be considerably paler than those achieved using the alcohol-soak method. So I decided to try out Sandra’s method with Sanderswood and with some Walnut and Redwood (Sequoia sp.) shavings I had been sent some time ago by a woodturner. I also remembered I had some Camwood, not in the form of wood shavings but as pressed wood dust, presumably also mixed with some sort of binder. These circular discs were sold to me some years ago by a Nigerian indigo dyer, who explained that they are used by Nigerians as a facial cosmetic, or decoration, rather than as a textile dye. (My husband also recalls that the same lady told us that camwood is rubbed on babies’ skins as an antiseptic, but I must admit that I can’t remember being told this.)
These are some discs of pressed camwood ready for crumbling up and soaking.
I started by putting a layer of shavings (or crumbled camwood discs) about 2 inches deep in the bottom of a glass jar & then I covered them with methylated spirits. I did this with each of the dyes I wanted to test. I then put the lids tightly on the jars and left the shavings to steep for several weeks until the liquid became strongly coloured. Incidentally, although meths is purple in colour, this purple doesn’t seem to affect the final dye colour. In addition to the dyes I tested, I also steeped shavings of birch in the same way but, as the liquid showed little evidence of colour change, there seemed no point in continuing with them any further.
The liquid is then strained off into a dyepot, together with more water as necessary, and the fibres are added.
Do not throw away the meths-soaked wood shavings as they need to be disposed of with care. Return them to their jars in the meantime. Details for disposing of the woodshavings and the used dyebaths are given below.
The crucial thing to bear in mind is that alcohol/methylated spirits is highly flammable & can easily catch fire near a naked flame. So the dyebath should not be heated on a stove with a naked flame, such as gas or coal or wood, but only on an electric heater. If in any doubt, allow the materials to soak in the dyebath without applying heat
I followed Sandra’s instructions but, as I have an electric heater, I heated the dyebath gently & then allowed the fibres to steep to absorb the colour. Below are the samples soaking in the dye solutions.
I was delighted with the results of the dyebaths made from camwood and sanderswood, as these produced really vivid reds not obtainable from the usual simmering method of colour extraction. However, the results from the other two dyebaths were less spectacular. The colours from the walnut shavings were even paler than those I achieved from similar walnut shavings using the usual method of colour extraction. The redwood which, according to the woodturner who supplied it, came from Sequoia sp., gave a rich red colour when soaked in meths but the dyebath produced greenish shades identical to those obtained from the redwood shavings using the usual dyeing method.
This image shows on the left from top to bottom: Sanderswood + no modifier, acid modifier, alkaline modifier and iron modifier; and Walnut + no modifer, acid, alkali, iron; on the right from top to bottom: Redwood (Sequoia sp.) + no mod, acid, alkali, iron and Camwood + no mod, acid, alkali, iron.
It is interesting that, with this method of colour extraction, the modifiers seem to make less difference in shade than I would have expected.
Although this method of colour extraction using alcohol/methylated spirits can produce really strong, bright colours with some wood shavings, there are several disadvantages to this method of dyeing. Firstly, the smell of the dyebath is very unpleasant if one uses methylated spirits, although the fumes do disappear after a while. Secondly, I found the methylated spirits left the wool fibres feeling a little harsh to the touch. Disposal of the used dyebaths may also present problems, as I would not recommend that they be poured down the drain. I poured mine on the gravel at the edge of my driveway, close to a brick wall. Disposal of the meths-soaked wood shavings might have been difficult, but my husband readily took them, still carefully stored in their glass containers, to use to start his garden fires. Otherwise, I would probably have dug a deep hole in the ground and burned them, then covered the ash with soil. Nevertheless, I was glad I did these experiments as they really illustrated very clearly the colour potential of the “insoluble redwoods” when used with the alcohol extraction method. For the first time, I was able to see some of the colours that were so popular with dyers in the past. So my thanks to Sandra Rude for suggesting these experiments to me. I think next time I will see if I can buy a bottle of cheap vodka to use instead of the meths, as I should imagine that might smell less unpleasant.
A New Dress for Milly
/in Diary & NewsAt last I have finished knitting the dress for my 9-month-old granddaughter, Milly. It’s now in the post and I hope it will fit her and that she will enjoy wearing it. More importantly, I hope that my daughter will approve of it, as I doubt whether Milly really has much fashion sense yet. In fact, I think she’s happiest when wearing as little as possible!
As I prefer to devise my own knitting patterns, I designed the pattern for the dress myself. The buttoned opening is at the front and I hope my daughter will be able to put the dress on Milly easily and without too much resistance. I usually write the pattern instructions down as I proceed, making adjustments as I knit, and then when the garment is finished I type up the instructions for future reference. I really enjoy working out my own designs and watching them develop, even if I sometimes have failures and have to unravel whatever I’m making and start again.
My next task will be to knit a jacket to match the dress.